Thursday, March 31, 2011

High Point Market


Well...I am off to the High Point Market in North Carolina for the weekend.  "The High Point Market is the largest furnishings industry trade show in the world, bringing more than 85,000 people every six months. Serious retail home furnishings buyers can be found in High Point twice a year because if you can’t find it in High Point…it probably doesn’t exist".  I am so excited about this opportunity to see all the latest in Furniture and Design, however, this means that the blog is being put on hold for the next few days. Check back next week, for some fun ideas and latest design trends that I pick up there. 

Have a great weekend!
c2

Tuesday, March 29, 2011

~Spring Has Sprung~

Well the time has come…SPRING IS HERE and it is time to spruce up (no gardening pun intended), and clean out. This seems like a pretty ridiculous post for me to blog about, seeing that I DO NOT have a green thumb or anything else green on my body. I have killed indoor plants…sad but true. It’s time to change that though, so after doing some research, not only will I blog about sprucing up your lawn and garden for spring, but I will also take my own advise! Here goes…

1. Add flowers and ornamental plants- It seems easy but, nothing adds quite as much color and beauty to a yard as flowers in full bloom. It also adds another LAYER to the exterior of your home. If you already have planting areas around your home, spend a weekend digging up the beds and plant some ornamental plants and flowers. Choose a variety of plants that will bloom during various times of the year so that something will always be in bloom with little upkeep…my kind of gardening! Help keep your planting beds beautiful and weed-free by using mulch, or by first putting down landscaping cloth before planting and mulching.


2. Spruce up your yard with a healthier lawn- A green lawn is a happy lawn! If the winter did not help your lawn in the green department, a simple application of lawn fertilizer and weed killer can make it lush and green in no time. If you have patches of bare ground in your yard, spread grass seed to fix these spots.


3.Add landscaping lights- You can find them pretty much anywhere (ie. Target, Walmart, Home Depot, Lowes, and Ace Hardware). Lighting can make the difference between an unattractive yard and a showplace. Just like indoor task lighting, ambient lighting, and table lamps, outdoor lighting creates a soft and inviting look to the exterior of your home.  A well-lit yard not only is beautiful, but it is also a more secure yard, as outdoor lighting is an overall deterrent for crime…Interesting!


These are great outdoor lighting fixtures because they are solar  powered and don't require any electrical work or direct power...you just stick them in the ground...easy enough :)


4. Hide unsightly fixtures- If you have areas in your yard that contain utility service boxes, pipes, well pumps or other eyesores, try disguising them with landscaping rocks. Sometimes all it takes is the strategic placement of a few large rocks, combined with tall ornamental grasses or some shrubs to transform these ugly areas into a beautiful spot in your yard. You can also purchase artificial rocks that are hollow, which are designed to be placed over these types of objects to completely hide them, while still allowing access to them when necessary.


5. Invest in Lawn Furniture- Try to think of your lawn or patio as an extension of your home rather than the outside of it. If you change our thinking than you could really create a beautiful “outdoor living space”. Go so far as purchasing an outdoor area rug that is moisture resistant. This will really give you a whole other living area to your home to enjoy the beautiful outdoors, and admire all of your handiwork in the garden!


Happy Spring!
c2

Sunday, March 27, 2011

------STRIPES------

Now I don’t know if I have shared a secret obsession I have….. but I am IN LOVE with stripes! It may be a little strange, but I just love everything about them! I think stripes are so versatile and really can work with anything or any space. I love to pair them with, other patters, different colors, shapes and textures. I especially love them on walls!

Recently we just moved into our first house and were soooo excited to put our own personal touch on it! I had been talking about doing a striped wall somewhere in our house, and my other half was a little bit tentative, because he thought it would look like a circus tent. I assured  him that I would do a very tasteful stripe, so he let me have at it!

I did it myself…which I don’t recommend. I would get a partner and some snap chalk lines to make the project A LOT easier. I used a laser level, which made it tricky but I pulled it off…ONCE in a lifetime occurrence. haha. It was a task, but it actually turned out to be one of my/our, many favorite parts of the house. See below, but keep in mind that is the first step…I have some layering to do on top of it, but it is a beautiful work in progress : )

You will notice that I divided up our entry wall into 7 sections. From there I taped off the darker section using the existing wall color as my lighter portion. I thought the more neutral palate works well for our home because I like to pull in other colors and have the stripes be a backdrop that work with anything. I also chose to do a horizontal stripe to give the illusion that the wall is longer than it really is...great for an entry wall to pull people into your home...not literally of course :)

Below are some different examples of how stripes can be used in your home and how they can really make an impact on any space no matter what the size:


This is a great example of using stripes to incorporate the color palate you want to have in your room. Using the stripe as the back drop, you can layer different colors, patters and textures on top of it, as you see above.


 You can do a vertical stripe to create height in your room and give the illusion that you ceilings are taller than they actually are....sneaky :)


In this example, they have used the striped wall as the focal point and than just have a more neutral palate layered on top, not to distract from them.LOVE THIS!


I love this example because it is not as dramatic as the previous examples, but still give a nice striped feeling without being to bold. I love how they did a dark, rich color and than pop-ed the white stripe out...it reminds me of a tailored pinstriped suite...very chic.


Talk about a POP! I love the boldness of these black and white stripes. I especially LOVE the asymmetry of them. Your stripes do not have to even...it creates interest!


Similar to the color palate I used in my striped, this picture represents rounding the striped through the corners. This is WONDERFUL to make a small room appear bigger. If you do it on two connecting walls your eye will aromatically continue on and not stop at the connection, therefore tricking your mind to think that the wall continues and the room is bigger! GENIUS!


I love how these stripes are so feminine. Just by changing the color palate, it changes the whole feeling of the room. So pretty and girly :)


This is a wonderful idea if you have great art that you want to showcase. By using the stripes to create a focal point you can really showcase your art and make them stand out...much like an art gallery!


I am OBSESSED with this example. If you think doing two toned stripes is too much for you, use the same color and change the paint finish. In this example, the base is a flat black and they used a high gloss black paint to create their stripe. This not only gives you the dramatic striped look with using the same color, but adds a great textural aspect to them....this may be my next project..I'm thinking in a powder room :)

------LET THERE BE STRIPES-----
c2

Saturday, March 26, 2011

BLOG SCHEDULE


 Hey everyone! Thank you so much for always checking into my blog. It is so fun for me, and I love all of your feedback, so keep it coming:)

Just wanted to give a little heads up on the blog. I know that a lot of you have requested more c2 updates, so I have decided  to do a new post EVERY OTHER day.  That is the plan and I am sticking to it...hopefully! Enjoy, and look out for tomorrow's post. It is one of my FAVES!


Happy Saturday!
c2

Friday, March 25, 2011

Who needs an actualy headboard?!!


I found this amazing article on the “Apartment Therapy” website and thought it was such a fun idea….who said you need an actual headboard to be a headboard?! Here are some fun ideas I thought I would share!

Frame it out!


Get Creative


Shutters


Art Work


Create your own


Use a Mantel


Or a Door


Or a Fence


Sleep Tight!
c2

Wednesday, March 23, 2011

10 EASY Decorating tips you can do in A DAY!

I know that most people are so busy during the week, and just look forward to relaxing on the weekends. For me, I love to move things around, organize, and decorate our home in my free time. I know, I know....this is weird!

For those of you who want your space to reflect you and look GREAT, but don’t want to spend too much time on doing so ...this post is for you! These tips are relatively quick and fairly inexpensive to do. They just take a little creativity and A DAY! You can do it!

1. Organize items on Trays- Corral items like TV remotes on a tray on the coffee table. Put liquor bottles, glasses, and bar accouterments on a tray in the living or dining room. This adds detail, texture and interest to any surface without looking cluttered :)


2. Remove Upper Kitchen Cabinet Doors-! If you love the look of glass cabinets, but want an affordable alternative, consider removing your upper doors. Arrange your dishes and glasses in an interesting way and put miscellaneous items in low wicker baskets that are all uniform. Now, I know this sounds a little crazy, but just try it…you can always put them back on. 


3. Paint your lampshades- Buy an inexpensive paper shade from a discount store, and paint it a BOLD color like a red. A red shade makes the light incredibly romantic, flattering and chic. Any color would work just to add a little punch to a room…I am going to try this for our bedroom. I’ll post a picture to let you know how it goes!


4. Bring the Outdoors in- Put branches in a container anywhere in your house. You could even go to Home Depot and get a small spotlight to light them from below. It casts fantastic shadows into empty corners, bare shelves, or awkward ledges and voids.


5. Refresh your Bath- Change your shower curtain, or just the liner. Add fragrant candles and a small bouquet or flowers. Also, if you clear the counters of everything except your prettiest essentials your bathroom will feel refreshes and serine, like a spa. 


6. Update your linens- Refresh your bedroom with new sheets. My favorites are white hotel-style sheets with a colored border. They have such a classic look; you can buy them anywhere. I actually just bought Hotel linens from Ross at a great price, and it completely transformed my night sleep… I feel like I am on vacation every night…HEAVEN


7. Wall Paper the back of your shelves- Don't forget about closets and shelving. Try papering the back of a cabinet or bookshelf in faux-snakeskin, crocodile, or fun pattern...it may just inspire you to rearrange your shelves.


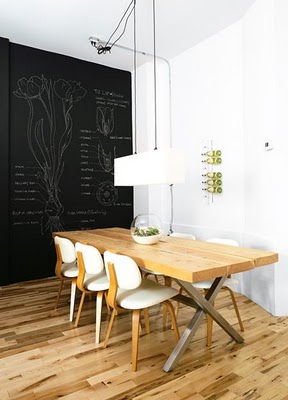
8. Remove your scatter rugs-Take up some of your rugs and bare your wood and stone floors. It also tricks the eye to thinking that the room is larger when you can see more raw square footage…. That is one of my favorite staging tips as well! People buy houses that feel bigger ;)


9. Accessories with books- Stack art, design, gardening, travel books — whatever you collect — on a table. I have said it once, and I’ll say it again, books are my favorite accessory because they're so personal and reflect your interests.


10. Hang Drapery High- If you hang your drapery rods as close to the ceiling as possible, with the drapery still just hovering the floor, your room will looks much taller than it really is, even it is higher than the top of the window. This technique creates a dramatic, vertical effect.


Make it simple on yourself! Happy Designing!
c2


Saturday, March 19, 2011

Chalkboard Paint


Happy Saturday to you all! I just thought I would do a quick post on a, very cool, new product out there. It is RUSTOLEUM’S Chalkboard Paint…Yes, you heard me right, Chalkboard PAINT! I love this product so much, I actually painted a wall in my office with it. Not only is it dramatic but also very practical….especially when I can’t find a pen and paper. It is so fun to experiment with and allows you to be as creative as you want.... if you don't like your artwork, just erase it :)
 Here are some fun ideas….


If a whole wall is too much for you, try just small area such as a door insert.


It's great for kids too :)


Great for organizing as well!


Have a wonderful weekend!

c2

Wednesday, March 16, 2011

Spring is in the Air :)


Spring is the air! Like myself I am sure some of you are getting the “itch” to spruce things up, clean things out, and change things around…well, maybe that’s just me! Well, if you are like me, than you will love this blog! My favorite trick to change things up and add character to a space is PAINT.

Did you know that it is just human nature to want to paint our walls? Ever since thousands of year ago, we have been painting our walls…..Cave painting and frescoed walls of Pompeii ring a bell? We are obsessed with painting our walls, and why shouldn’t we be…it’s just so fun! Here are a few things I think you should know about paint…..

1. All paints are not created equal. Don’t buy the cheapest paint you can find. A higher price point means the paint is more likely to leave your brush smoothly and evenly, requiring fewer coats. And higher-quality paint will stand up to stains, scuff marks and scouring for years to come.
2. Most paints come in a spectrum of finishes from matte to glossy, and while glossy is more robust, it’s also far less forgiving. It reflects light instead of absorbing it, highlighting the imperfections in both your paint job and your wall. But consider using a glossy finish on trim for a practical touch of glam. Eggshell—forgiving and durable—is a happy medium for most surfaces.
3. When it comes to color, Be fearless. Find a color that you love and paint it in an unexpected place; try a bold color on the ceiling of an enclosed space or on the back wall of a bookcase for a 3-D effect that is oh-so-21st-century chic.
4. A paint job is only as good as the prep job, so take the time to scrutinize your walls; make sure cracks are filled, holes are puttied and texture is consistent. If you’re covering a dark color with a lighter one, tint the primer with the finishing color. It will reduce the number of coats you need.
5. No matter who paints your walls, every home should have a few basic supplies for the inevitable touch-up. Buy an all-purpose synthetic sash-angled brush; Purdy makes some of the industry’s best. For bigger jobs, invest in a lamb’s wool roller—it won’t spatter your paint, as the cheaper ones tend to do.
6. When it comes to storing your paint, use an airtight container and put it in a cool, dry place, where it will last for years. Label the paint with specifics such as where you used it and when…it makes life my easier later on.


Paint coats our lives. Everywhere you look, you’ll find something cloaked in some form of paint. The idea that such a thin film can protect, interest or even wow us—well, that makes paint the chicest coat of all.


Happy Painting
c2

Monday, March 14, 2011

Design Trends


As most things in life, trends come and go. Same is true for the Design world, however through the years, I have noticed a few that are sticking around. In fact, I have to admit , the current interior design trends are exciting! They shout sophistication regardless of specific style – casual, traditional, contemporary or classic. Now is not the time to be “matchy-matchy” and super uptight! Play around and have some fun with your space. It’s yours…go CRAZY!

These are a few of my faves…

Style Mixing:

Using one style for your focal point and adding elements of another one contributes to the look of today’s popular interiors. I love the combination of classic and contemporary elements blended together…it is so refreshing and chic!


Glamour and Shimmer:

I mean who doesn’t like a little sparkle in life every once in a while?  For instance infusing interiors with a hint of shimmer in silky fabrics, glistening mosaic tiles, high gloss paint and fabulous glass or crystal lighting! Oh it just sounds so lavish  :)


Pale/Neutral Palettes:

This is one of those trends that is sticking around, and I couldn’t be more excited about it! It is the perfect base to add onto for every season, every mood, and every budget. I love the idea of a rich taupe or beige wall with crisp white trim and molding encasing the room. It just screams chic! Using a neutral palate in your space often times make you feel put together, and than adding a punch of color and texture, really seals the deal!

White Kitchens:

This is a new one, but I think it is hanging in as well. It used to be that every one wanted really rich wood cabinetry and dark granite….now it is quite the opposite. White/Light Kitchen are IN….In a kitchen it is so important to feel clean and sanitary, and this is where this trend stems from.  Having lighter cabinetry goes very well for having rich dark floors to balance the space and really create a space of warmth. LOVE LOVE LOVE!

Finishing Touches:
Books are a key element among the interior design trends in accessories. As designers, we will often create stacks of them to display. On tables, on shelves, on the floor…stacks of books continue to be a hot finishing touch. In many cases I think the color and texture they provide for the design scheme is more important than their actual content…like anyone reads them anyway.

On the walls, black and white photography continues to be a hot choice. It’s a great way to add your own personal touch or create the feeling of a gallery. Plus it adds some refreshing contemporary pizazz to any room’s style... and how can you resist pizzazz!

 Happy Designing
c2